42 toy car ramp experiment
Explore ramps, angles, and friction with just a few simple materials. This physics activity is a fun way to introduce friction, ramps, and angles to kids through hands-on play! Exploring Ramps, Angles, and Friction Supplies Needed Materials to make ramps; you can use cardboard or wood planks! Variety of toy cars Set up a ramp. Tape a 1g gram cube to the back of the car. Roll it down the ramp and measure the distance from the bottom of the ramp to the back of the car. Record your data. Repeat Step 3 two more times. Tape a 20g gram cube to the back of the car. Roll it down the ramp and measure the distance from the bottom of the ramp to the back of the car.
In the experiment that corresponds to this work sheet, students will be racing toy cars down a ramp. They will determine how height affects speed, how weight affects speed, and how ramp material affects speed with the help of these worksheets featuring a spot for their predictions, their data, and Subjects: Physical Science, Physics, Science
Toy car ramp experiment
Car u0026amp; Ramp: Speed u0026amp; Acceleration Teacheru2019s Notes. This experiment will use photogates to find the speed and acceleration of a car rolling down a ramp. [Filename: ASLab_4.pdf] - Read File Online - Report Abuse. Ramps, Force, and Motion - Educational Equity Center at FHI 360. kneel down behind the ramp. Investigating the speed of a toy car travelling down a ramp · Set the ramp up 25cm from the work surface · Set the light gate at 90cm from the second clamp stand ... Step 2: Cover the ramp with with white banner paper. This step is optional as you could paint directly on the cardboard. Step 3: Add paint at the top of your ramp. Rev up your race cars in the paint and race them down the ramp. Create and experiment with some new type of tire marks along the way. We started with only 2 color of paint and ...
Toy car ramp experiment. Car and Ramp Experiment Speed and Acceleration Instructions: 1) Turn on CPO Timer by the switch on the left. 2) Hold the car at the top of the ramp. 3) Set the green light on the CPO Timer to "Interval." 4) Press the red Reset Button. 5) Let the car go!! When the car reaches the bottom, the data from the gates gets stored in the CPO Timer. The Ramp Experiment - YouTube. This video shows the difference in speed when a toy car goes down the same ramp, for the same distance, but the ramp has a different surface in each test. Then, all you need to do is let the toy car go down the ramp without exerting any force. You should measure and record how far the car can go as well as how long it takes for the car to complete the ramp. After a few attempts, remember to collect the data in a table. 3. Experiment Results Explore friction using toy cars. Work with a group to investigate friction and to see what happens to the distance a toy car travels when you change the surface at the bottom of a ramp. With support understand what makes a test fair and how to measure accurately.
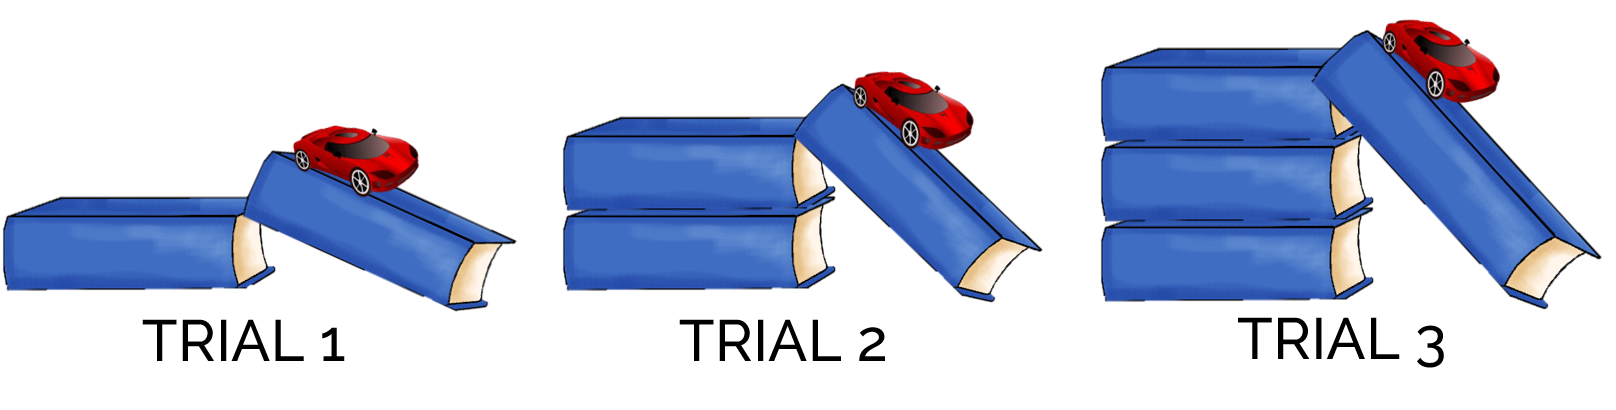
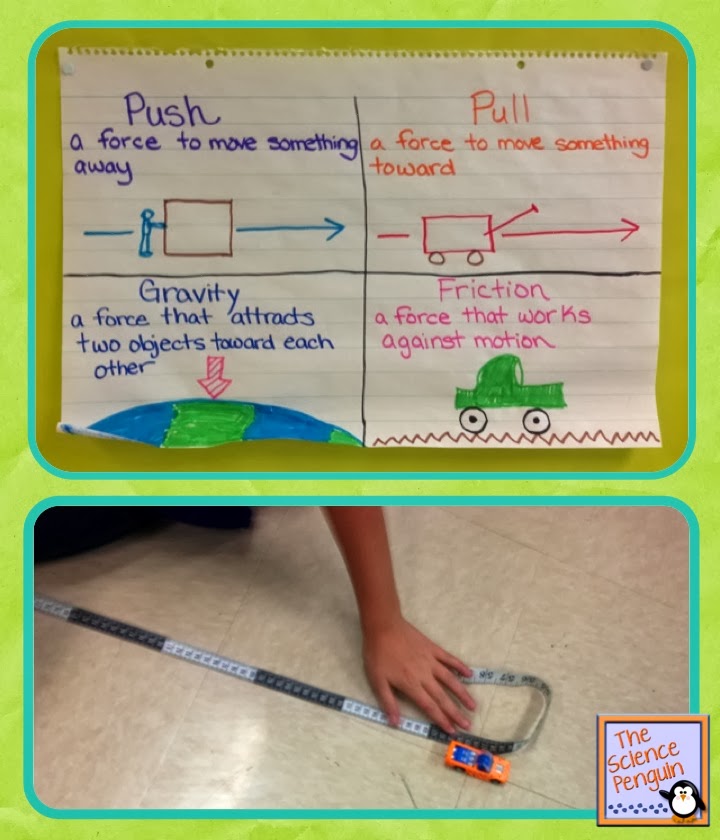
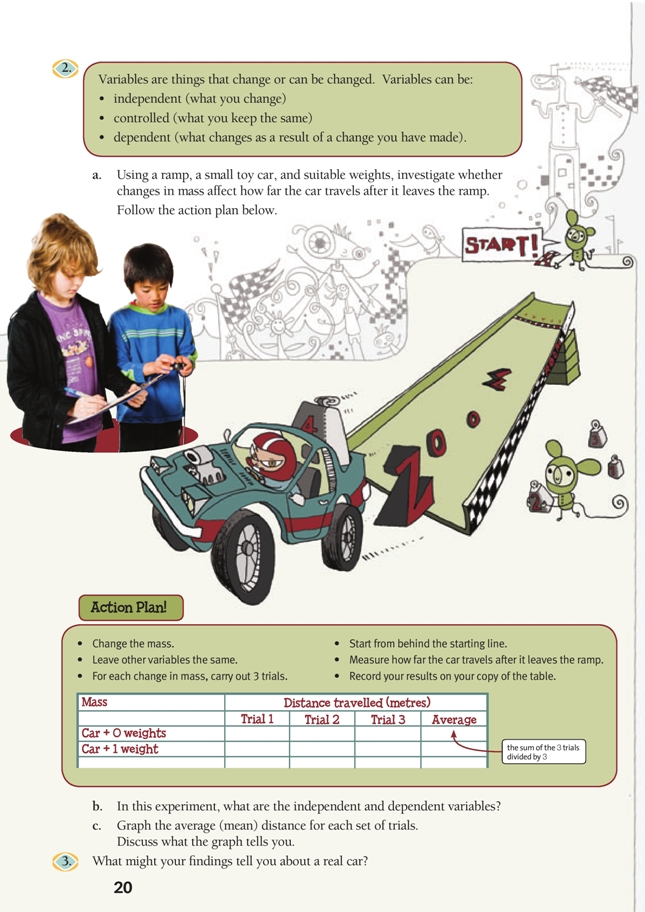
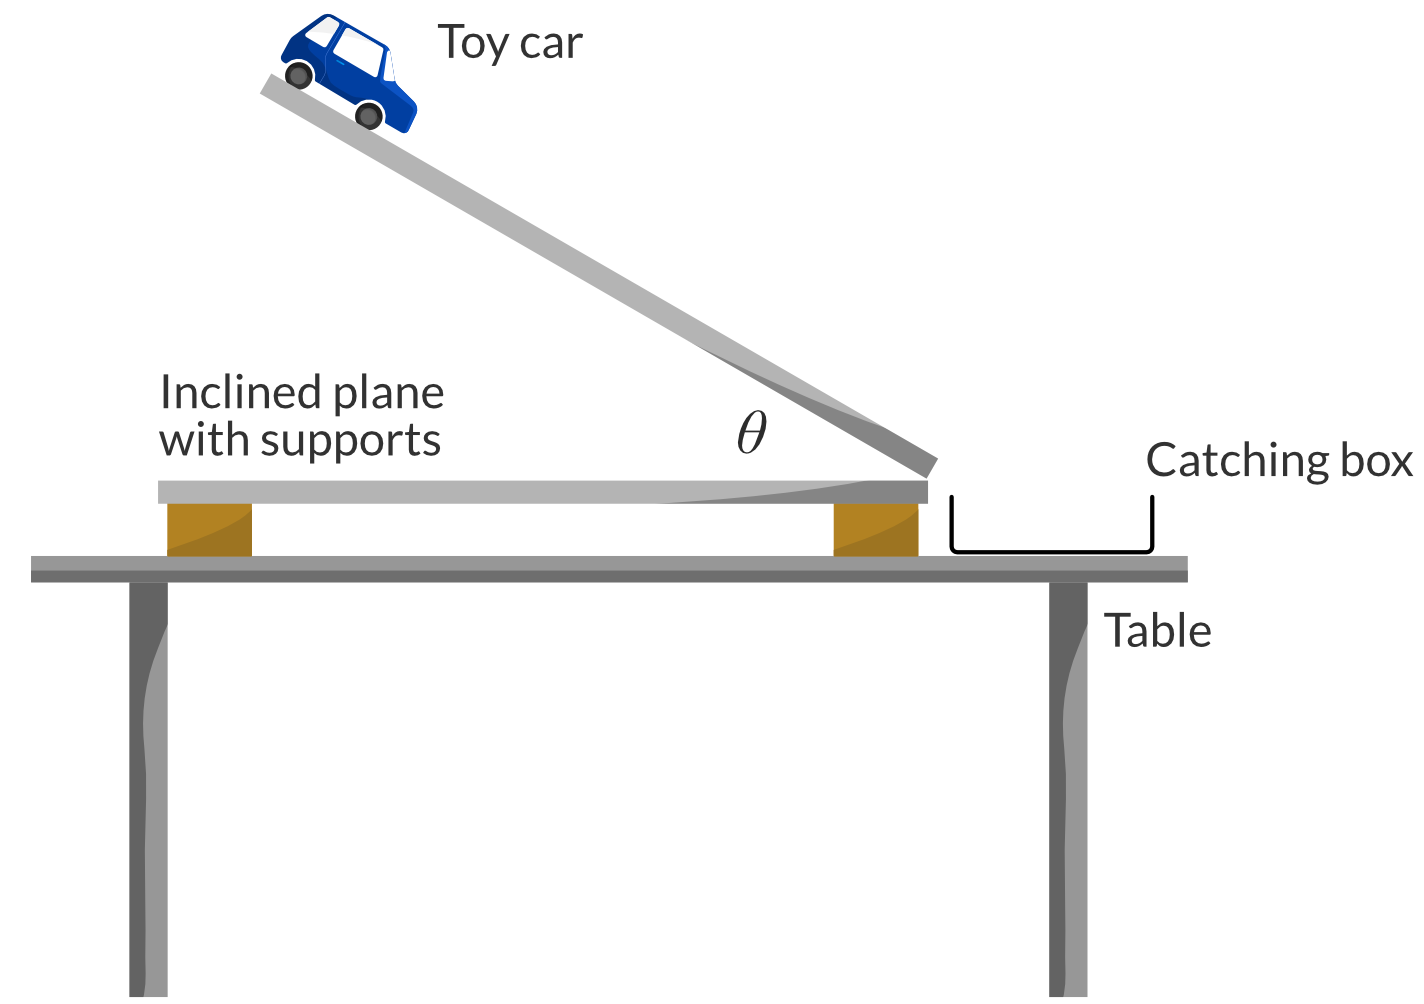
When you put cars on a ramp the force of gravity pulls them downwards but the force of friction acts against this. The different textures you tape onto the ramps will change the surface of the ramp and provide different amounts of friction - more friction will slow the cars down, less friction will let them travel faster. Using the scientific method, students explore what happens when you roll a small toy car across three different ramp textures. Is friction involved? Hold the toy car at the top of the ramp, aligning the back of the car with the edge of the ramp. Have the camera ready to record. Start recording video and release the car, without pushing it, allowing it to roll freely down the ramp into the catching box. Repeat steps 3-4 twice more. Increase \theta by 10\degree. In this Science experiment, students will be testing how much the height of a ramp and the weight of a toy car effect the distance the car travels. Students should be given some time to experiment with their ramp and car by increasing or decreasing the ramp height and adding weights to the car (weights could be as simple as coins taped to the car).
Car on ramp: surface investigation. Work with a group with support to understand what makes a test fair and how to measure accurately. Investigate toy vehicles to see what happens when you change the surface at the bottom of a ramp. Suitable for Year 2 pupils. Hamilton's science scheme uses hands-on investigative science activities to promote ... Toy Car on Ramp Science Forces Experiment Beyond Use this image now, for FREE! Create your own Toy Car on Ramp Science Forces Experiment Beyond themed poster, display banner, bunting, display lettering, labels, Tolsby frame, story board, colouring sheet, card, bookmark, wordmat and many other classroom essentials in Twinkl Create using this, and thousands of other handcrafted illustrations. Create your own Toy Car on Ramp Science Forces Experiment Beyond themed poster, display banner, bunting, display lettering, labels, Tolsby frame, ... 5.0 Conclusion. In conclusion, the experiment demonstrated that the ramp set on (50cm) height at the distance of (90cm) had a greater velocity (speed) and acceleration than other heights. This suggests that the car had a greater velocity and lowest time was because of the steepness of the ramp that was set on.
Getting Ready to Teach: Force and Motion — THE CLASSROOM NOOK
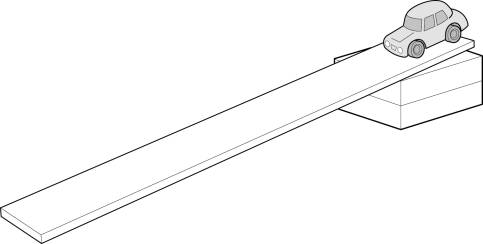
Aim of the experiment To investigate the acceleration of an object on an angled ramp. Method Set up a ramp balanced on a wooden block at one end. Mark out 30 cm at the end of the ramp. Avoid making...
resources
A toy car speedway is a fun and engaging activity for primary school children but also has plenty of opportunities for learning. This activity can be used to allow children to learn about the principles of gravity and friction and how they affect speed but also to practice a wide range of skills relating to maths, science, team work and communication.

How to do a friction science experiment – Artofit
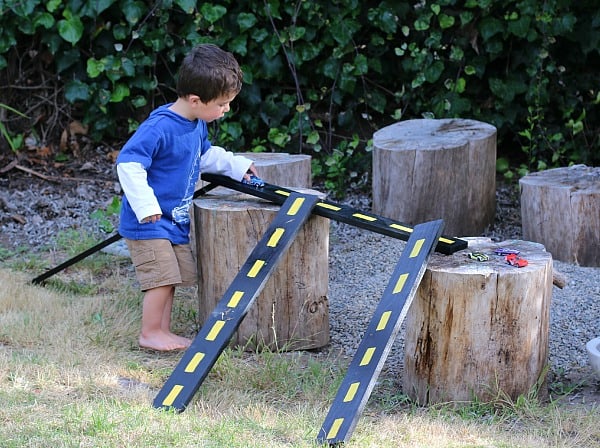
We recently got a new washer so I pulled some of the cardboard packaging out to use as ramps and grabbed a few cars from our toy bin. We then used these to experiment with force, motion, & gravity. I set the ramp up using a table in our playroom and then girls pushed the cars down with different amounts of force. At first we only gave them a little push, a small amount of force, to send them down the ramp.
Toy Car on Ramp Science Forces Experiment Beyond Illustration ...
Procedure. 5. Let go of the toy car at the top of the ramp. 6. Make sure you're lookin at the ruler, because when the toy car bounces back, you're to find the distance/the furthest the toy car goes when it bounces back. 1. Set the ramp up/ where you're going to let go of the toy car. 2.

ICCSE Edexcel Physic Help: 1.4 describe experiments to ...
This short video shows students a simple experimental investigation and asks them to determine what question the investigation was designed to answer.

Investigating Gravity and Friction: Toy Car Speedway ...
#1) First, grab a meter stick and place it vertically in front of you. Tip: Make sure the terrain you are conducting this experiment on, is flat and solid. Meaning no hills, bumps, papers or any obstacle that can throw your analysis off. Not only that, but make sure you have enough space to manage this operation.
MOVING ON DOWN
Exploring Ramps and Friction from Pre-K Pages. Playing with Wooden Car Ramps from Buggy and Buddy . Cereal Box Ramps from A Little Pinch of Perfect. Engineering with Ramp Making Materials from Teach Preschool. Apple Gravity Experiment from Little Bins for Little Hands . Wooden Ramp Challenge Set. Rolling Eggs Experiment from Science Sparks
Because Learning
In the experiment that corresponds to this work sheet, students will be racing toy cars down a ramp. They will determine how height affects speed, how weight affects speed, and how ramp material affects speed with the help of these worksheets featuring a spot for their predictions, their data, and Subjects: Physical Science, Physics, Science
DIY Wooden Roads and Ramps for Toy Cars - Buggy and Buddy
4. Release your toy car from the top of the ramp and using a stopwatch record how long it takes to reach the bottom of the ramp. 5. Let the car travel off of the ramp. When it has finished moving use your tape measure to record how far it travelled beyond the end of the ramp. Record the travelling time and distance travelled beyond the ramp in ...
Exploring the Scientific Method with Toy Cars
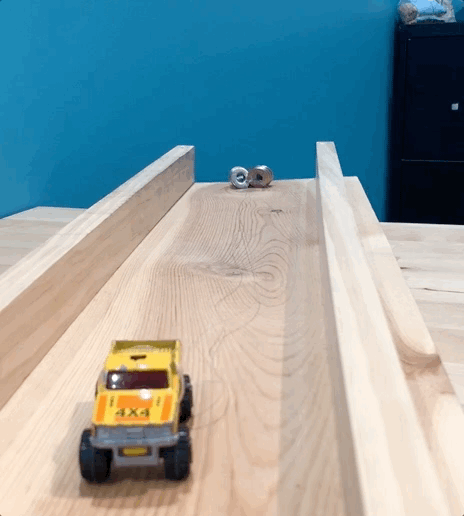
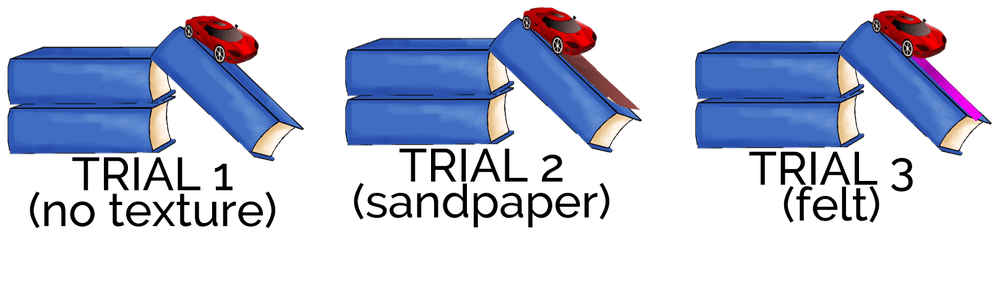
Steps Tape or glue each textured material to a separate plank/piece of cardboard. Leave one blank as a test ramp. Set up your ramps against a stack of books, some steps or other raised object. Make sure all the ramps are sitting at the same angle. Test your toy car on the bare ramp by placing it at the top and letting go.

Easy DIY Ramps for Toy Cars {Made from Scrap Wood} | And Next ...
Experiment 1: How does the height of the ramp affect the distance the car goes? In this experiment, you're going to find out how different amount of GPE affects the distance the car travels. To do this, you're going to adjust the angle of the ramps. The higher the ramp, the greater the GPE and the more force that is exerted on the car.
Lesson 1 Describing Motion Review
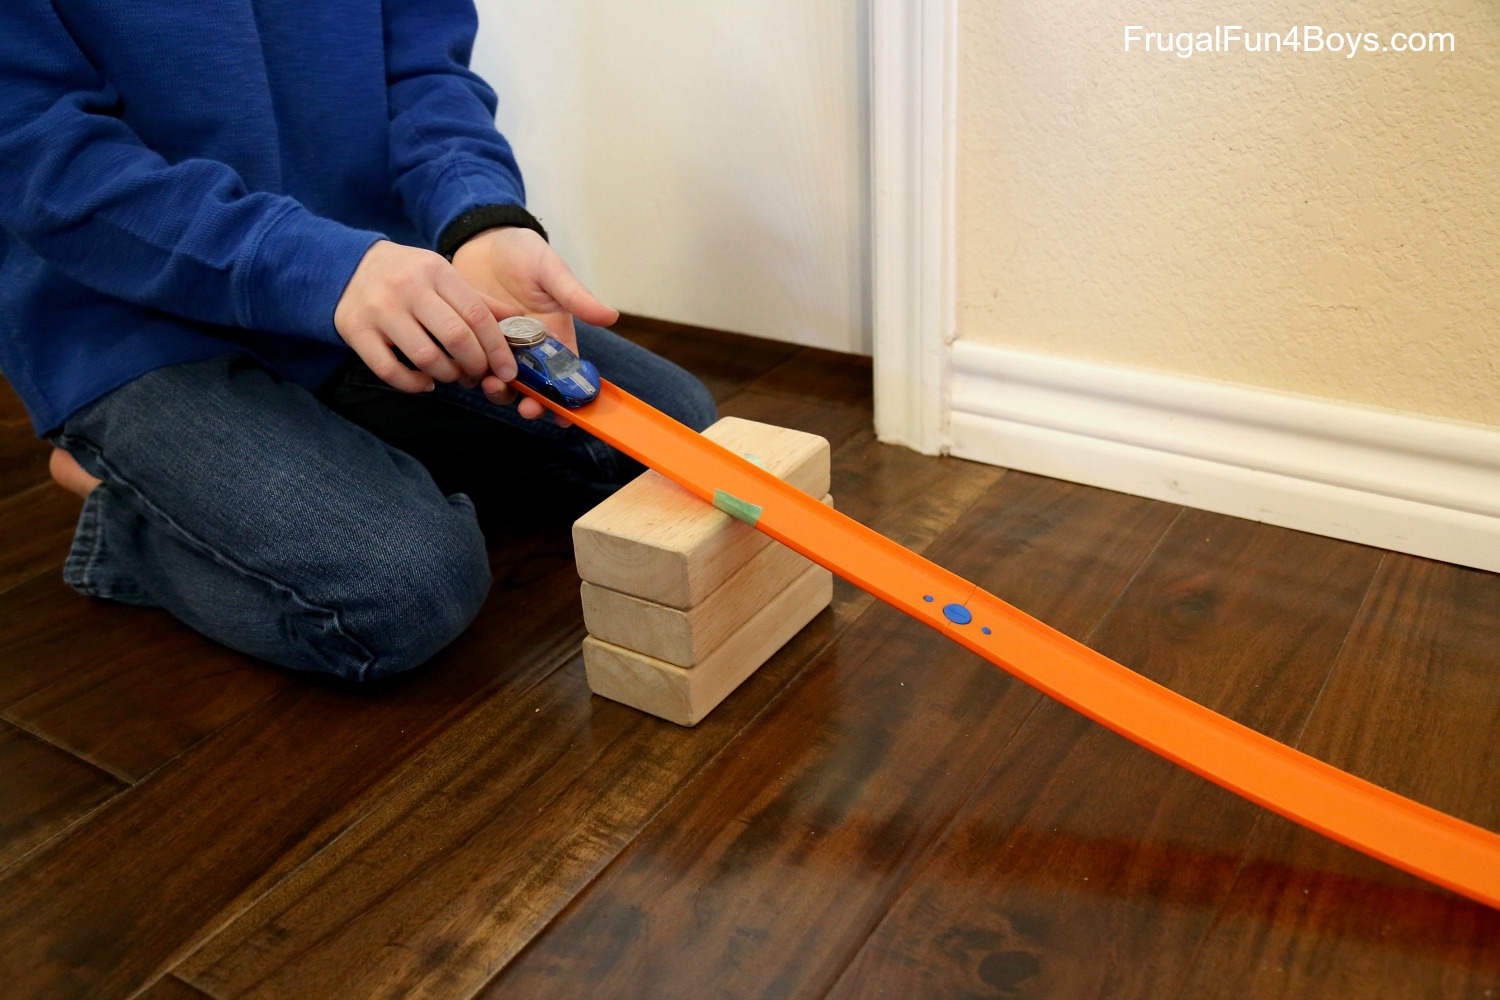
cars or similar toy cars. Experiment #1: Heavyweight Race Track Willaheavyoralightcartravelfarther? To test this, have kids set up a basic ramp. Release a car down the ramp and measure how far it travels past the ramp. Then try adding weight to the car and do it again. Quarters work well for weight. We attached three quarters to the back of the car with clear tape.

Inclined Planes – Simple Machines for Kids – Inventors of ...
When a marble or toy car is let go at the top of a slope it is pulled down the slope by the force called gravity. Different weights are pulled down at the same speed (remember Galileo's famous experiment from the top of the Leaning Tower of Pisa). But the distance they travel when they reach a flat surface at the bottom depends
Awesome Science Experiments with Hot Wheels Cars - Frugal Fun ...
Ramps, gradients and friction. Today's activity is all about ramps, gradients and friction. We're going to investigate how the distance travelled by a car is affected by the gradient of the slope and the surface of the ramp. A ramp - we used this brilliant ramp from The Consortium, but you could make your own with cardboard or wood.
CR Investigations.book
Step 2: Cover the ramp with with white banner paper. This step is optional as you could paint directly on the cardboard. Step 3: Add paint at the top of your ramp. Rev up your race cars in the paint and race them down the ramp. Create and experiment with some new type of tire marks along the way. We started with only 2 color of paint and ...

Pictures and Diagrams *The most important thing is to really ...
Investigating the speed of a toy car travelling down a ramp · Set the ramp up 25cm from the work surface · Set the light gate at 90cm from the second clamp stand ...

Toy Car Road Surface Investigation
Car u0026amp; Ramp: Speed u0026amp; Acceleration Teacheru2019s Notes. This experiment will use photogates to find the speed and acceleration of a car rolling down a ramp. [Filename: ASLab_4.pdf] - Read File Online - Report Abuse. Ramps, Force, and Motion - Educational Equity Center at FHI 360. kneel down behind the ramp.
Getting Ready to Teach: Force and Motion — THE CLASSROOM NOOK

Car STEM experiments for kids - Taming Little Monsters

How Does Friction Affect the Speed of a Toy Car?

Lesson Worksheet:Patterns of Motion | Nagwa

Away we go

Excellerations® Wooden Ramp STEM Discovery Set with Ramps, Textured Surfaces, and Cars

Car STEM experiments for kids - Taming Little Monsters
toy car on ramp science ope ope whakamatau tua atu pango me ...
PPT - Science Process Skills PowerPoint Presentation, free ...

Car and Ramp Labs: Motion on horizontal and inclined planes ...

Investigating Gravity and Friction: Toy Car Speedway ...

Investigating the speed of a toy car travelling down a ramp ...
Zoom, Zoom! | NZ Maths

Toy Cars Distance vs. Time Data Table Car #1 Car #2

Because Learning
Hypothesis: Aim: Variables: Apparatus: Method: Discussion ...

Sci122 Lab - Kinematics

Friction Lab with Toy Cars
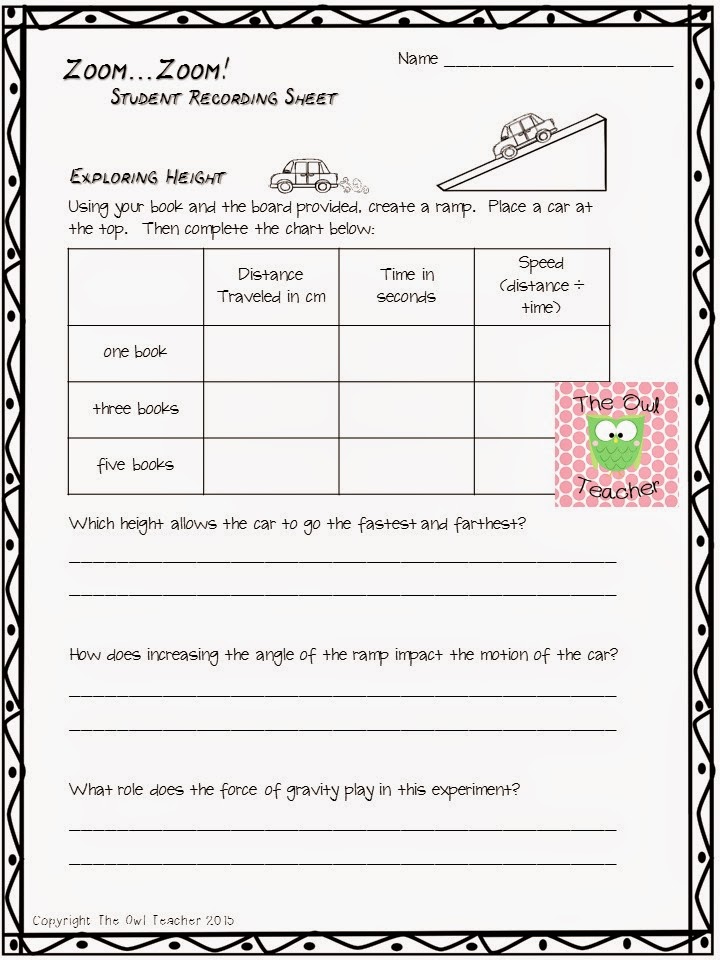
Zoooooming with Force and Motion! - The Owl Teacher

Car and Ramp Labs: Motion on horizontal and inclined planes ...
Year 11 Physics Practical Investigation | Acceleration ...

Effect of Height on Velocity | Experiment

Car on ramp: surface investigation | Teaching Resources

Force and Motion Toy Car Experiment!

Fair Testing. Which of these is a fair test? We wanted to ...
0 Response to "42 toy car ramp experiment"
Post a Comment